
Workspaces and panels
Last updated
Lumit’s panels dock and split. An arrangement of panels is a workspace, and there are six shipped ones plus however many you save.
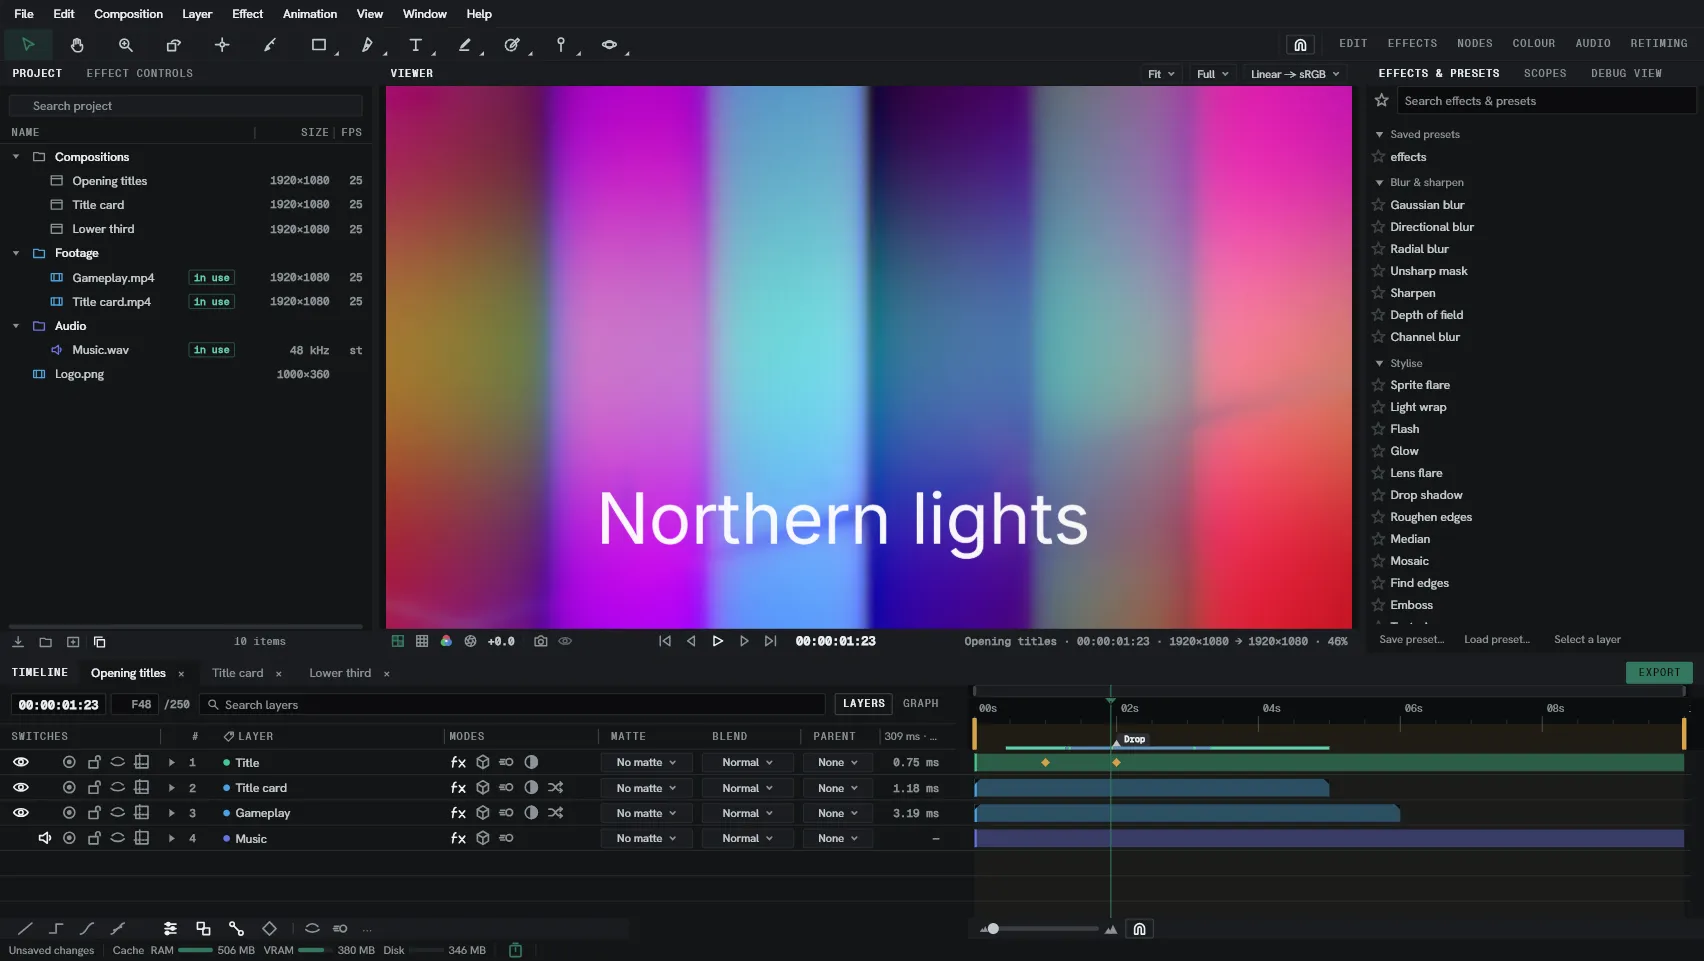
The panels
Section titled “The panels”Every panel is in the Window menu, with a tick showing whether it is in the arrangement. Toggling one adds or drops it.
| Panel | What it is for |
|---|---|
| Viewer | The picture, and the tools that work on it. |
| Project | Assets and folders. |
| Timeline | Time, layers, keyframes, and the graph editor. |
| Effect controls | The selected layer’s whole effect stack, parameter by parameter. |
| Effects & presets | Every effect, preset and installed plugin. |
| Node graph | Boxes and wires: the selected layer’s stack, a Custom shader’s inner graph, or a node graph composition. See The node graph. |
| Node | The parameter rows of whichever box the Node graph has picked, and the form of a Read or Input box. |
| Easing | Shape a curve and apply it to the selected keyframes. |
| Scopes | Waveform and vectorscope. |
| Hierarchy | The open composition’s layers as a tree, precomps expandable. |
| Debug view | Engine readouts. Off unless you turn it on from the Help menu. |
Rearrange
Section titled “Rearrange”Drag a panel’s tab. The frame you drag it over shows where it would land:
- Over the middle joins that group as another tab.
- Near an edge splits the frame and puts the panel on that side. The panels either side resize proportionally.
Drag a seam between two panels to change their share. Press ` (backtick) with the
pointer over a panel to maximise it to the whole window, and again to put it back.
Right-clicking a panel’s tab offers Close panel.
The shipped workspaces
Section titled “The shipped workspaces”The strip at the right-hand end of the toolbar switches between them, and so does Window ▸
Workspace. Alt+Shift+1 to Alt+Shift+9 reach them by position, counting the presets
first and then your own.
| Workspace | Arranged for |
|---|---|
| Edit | The default. Project left, Viewer centre, Effects & presets right, Timeline across the bottom. |
| Effects | Effect controls promoted to a column of its own, Effects & presets widened. |
| Nodes | The Node graph across most of the window, a short Timeline under it, a small Viewer and the Node panel down the right. |
| Colour | Scopes given a wide right-hand column, Viewer dominant. |
| Audio | A taller Timeline with waveforms open, Viewer reduced. |
| Retiming | The Easing panel taking the right-hand column outright. |
Rearranging under a preset moves the panels and leaves the preset alone. Window ▸ Workspace ▸ Reset workspace puts the preset you are on back to how it shipped.
Save your own
Section titled “Save your own”Window ▸ Workspace ▸ Save as new workspace… asks for a name and writes the arrangement out. It joins the strip beside the presets.
The same menu carries Rename workspace…, Delete workspace, Export workspace…
and Import workspace…, each live only on one of your own. Export writes a
.lumworkspace file; Import reads one.
Your workspaces are listed alphabetically. A name is taken only once: saving a second Grading gives you Grading 2.
A workspace of your own keeps what you drag into it. Move a panel while one is in force and the change is written back to its file. Deleting one leaves the panels on screen where they are.
What the project stores
Section titled “What the project stores”A project opened on another machine is the same edit under that machine’s panel arrangement.
| Yours, per user | The project’s |
|---|---|
| Which panels are open, where, size | Which compositions are open, and which is in front |
| Timeline column visibility and widths | Per-composition Viewer state: resolution, magnification, channel, guides |
| Interface scale, tooltips, motion | Per-composition Timeline state: twirls, work area, playhead, zoom |
| Where a settings or export window was left | Guides, markers, the region of interest |
Switching workspace never closes, reloads or re-renders anything. It only moves panels.
How large everything draws
Section titled “How large everything draws”Settings ▸ Appearance ▸ Interface ▸ Scale runs from 75 % to 200 % in steps of 5, with a field beside the slider for typing value.
Three more settings sit under it: Tooltips, on or off; Motion, how much controls animate as they change; and Compact, which tightens row spacing throughout.
The command palette
Section titled “The command palette”Ctrl+Shift+P opens the command palette. Search for any command and run it.
The menu bar
Section titled “The menu bar”Nine menus: File, Edit, Composition, Layer, Effect, Animation, View, Window, Help. A menu item that needs something you have not selected appears disabled.