
Guides / Using Lumit / Layers
Updated
Cutting
The Cut workspace arranges Lumit for cutting footage: a source view beside the composition in the Viewer, and the Cut timeline across the bottom with the Mixer at its right.
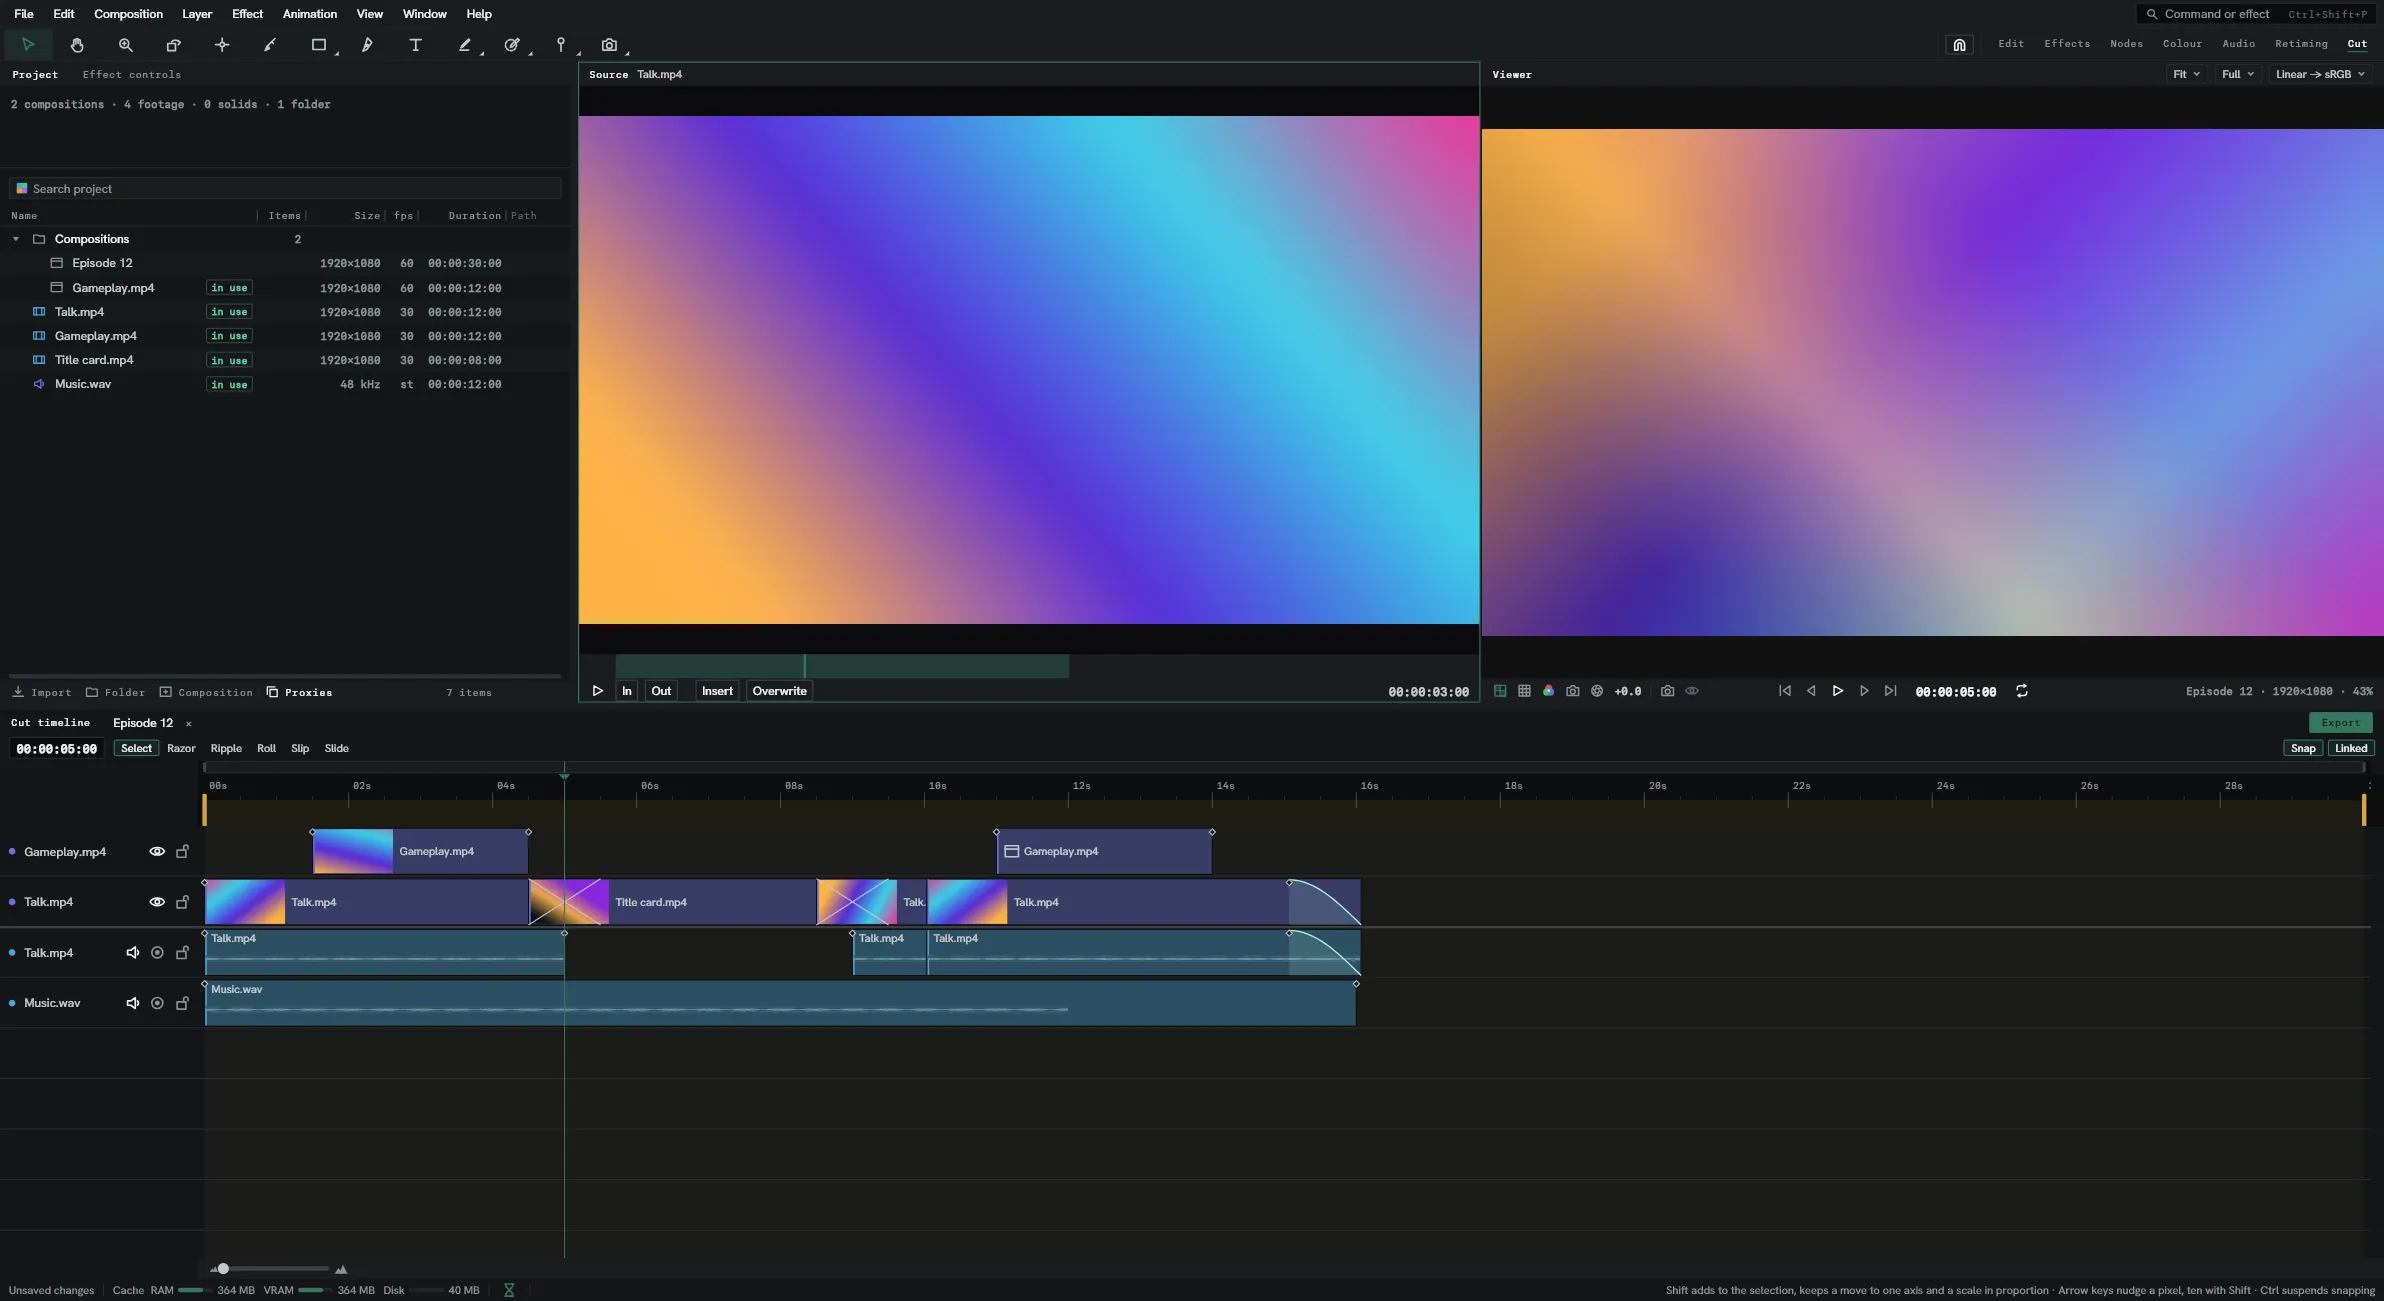
The Cut timeline shows the open composition. Each track is a layer of that composition, and the same composition opens in the Timeline and the Audio timeline.
Tracks
Section titled “Tracks”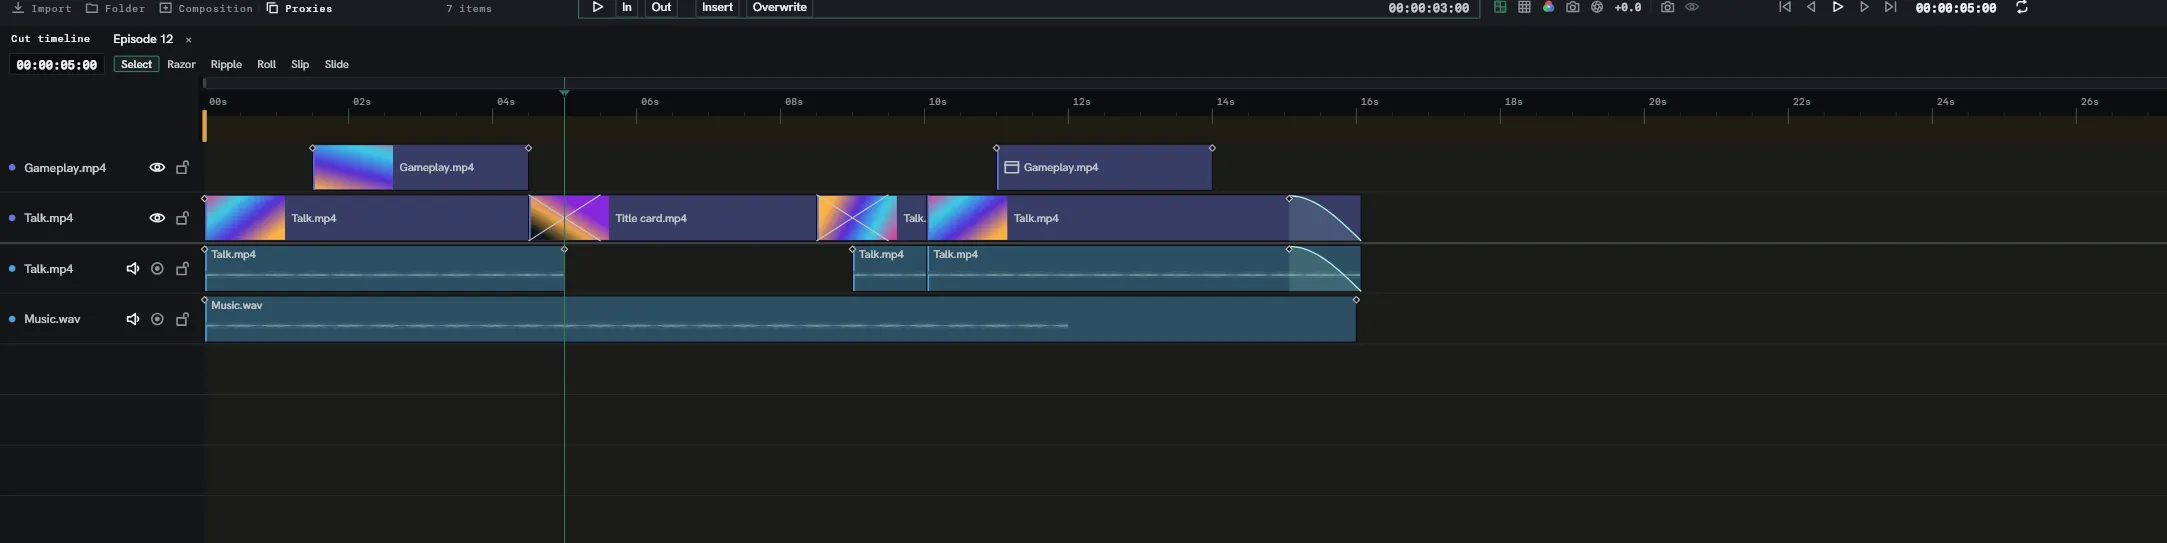
- A picture track is a Sequence layer. Picture tracks stand above the dividing line, and the top one wins the picture.
- A sound track is an audio-only Sequence layer. Sound tracks stand below the line.
- Any other layer draws as one plain bar on a track of its own.
- A footage layer with sound also draws its sound on a track below the line. Both tracks are the same layer.
With Settings ▸ Timeline ▸ Cut tracks in any order on, the tracks stand in the composition’s layer order and there is no line. Drag a track’s name up or down to move it. With the setting off, a track moves only among the tracks on its side of the line.
Drag the lower edge of a track’s header to make the track taller or shorter. Double-click the edge to put it back. Heights are saved with the project. Drag the headers’ right edge to make them wider or narrower, from 120 to 480 pixels.
A track’s header has a Vol and a Pan slider on a sound track and a Level slider on
a picture track, where the track is tall enough. Drag across one to change it, with Ctrl
for finer steps. Double-click puts it back. On a keyed property the slider sets a key at the
playhead.
A track wears its layer’s label colour: its clips are tinted with it and their waveforms drawn in it. Right-click a track’s header for Volume envelope, Pan envelope, Minimise all tracks, New layer, Duplicate, Delete and Label colour. Minimise all tracks again puts them back. Clip colour on a clip’s menu gives the picked clips a colour of their own, and Track colour hands it back.
A picture clip shows a strip of its frames. A retimed clip’s frames follow its speed.
Right-click the empty ground under the tracks for Insert audio layer, Insert video layer and Insert adjustment layer. Each adds an empty track above the selected one, or at the top. With nothing selected an audio layer goes to the bottom.
Double-clicking the bar of a Precomp layer opens its composition.
The source view
Section titled “The source view”Double-click footage in the Project panel to load it into the source view. Drag along the strip under the picture to move through it.
| Control | What it does |
|---|---|
| Play | Plays the footage from the frame shown, with its sound. |
In, I | Marks the frame shown as the start of the stretch to place. |
Out, O | Marks the frame shown as its end. |
Insert, , | Places the marked stretch at the playhead and moves everything after it later. |
Overwrite, . | Places the marked stretch at the playhead, over what is there. |
With no marks set, the whole item is placed. The clip lands on the selected picture track, or the lowest one, or a new track when the composition has none. The playhead moves to the end of the placed clip.
In and Out are kept on the footage item and saved with the project. Setting them is one undo step, Mark In and Out. An Out that is not after the In is refused.
A video with marks brings only its marked stretch wherever it is placed. Dropped in the Timeline, its In lands on the composition’s start. Dropped on a track, the clip holds the marked stretch, and several files dropped together are spaced by their marked lengths.
I and O mark the source while the source view has the keyboard. With the Cut timeline
active they set the start and end of the work area at the playhead.
With the source view in front and the Viewer active, the transport keys play and step the
clip instead of the composition: Space plays it, Page Up and Page Down or Ctrl+←
and Ctrl+→ step a frame, Shift+Page Up and Shift+Page Down step ten, and Home and
End go to its start and end.
Choosing any workspace other than Cut takes the source view away. One view in the Viewer keeps the composition.
Footage dragged from the Project panel onto a track makes a clip where it is dropped.
Dropped on empty ground it makes a new track. Several files dropped together land one after
another on one track, in the Project panel’s order. Hold Shift to give each a track of its
own, all at the drop point. A still takes five seconds.
A clip placed past the end of the composition lengthens the composition to fit.
F loads the footage of the clip under the playhead into the source view, on the frame the
composition is showing. Double-clicking a clip does the same and shows the clip’s own
stretch as In and Out. Neither changes the marks kept on the item.
Linked clips
Section titled “Linked clips”Footage with picture and sound is placed as two linked clips: the picture on a picture
track, its sound on a sound track. While Linked is on they select, move, trim and cut
together. Alt+click selects one alone. Shift+L turns Linked on and off.
The picture clip is silent, and its sound is heard from the linked clip. With Settings ▸ Timeline ▸ Video sound in Cut set to With the picture, the sound stays on the picture clip and is drawn along its foot. A picture track whose audible switch is off keeps its sound on linked clips either way.
Right-click a picture clip for Detach audio, which puts its sound on a sound track as a linked clip, and Attach audio, which puts it back. Attach audio needs the sound clip to cover the same stretch as the picture.
A sound file dropped on a picture track plays on that track, and sound clips move between sound tracks and picture tracks. A picture clip never goes on a sound track.
Footage with several audio streams places every stream, mixed, unless the Several audio streams arrive as setting says otherwise. Right-click a clip for Split audio streams, which puts each stream on a sound track of its own as a linked clip, and Merge audio streams, which puts them back on one clip.
A tap of a tool’s key arms it. Holding the key arms it for one gesture and goes back to the tool before on release.
| Tool | Key | What a drag does |
|---|---|---|
| Select | V | Moves clips in time and between tracks. An edge trims, and Shift+drag on an edge stretches. A drag over empty ground selects every clip it crosses. Alt+drag leaves the clips and moves copies. Ctrl+A selects every clip. |
| Razor | C | A click cuts the clip under the pointer. Shift+click cuts every track. |
| Ripple | B | An edge trims, or with Shift stretches, and everything after the clip follows. |
| Roll | N | An edit point moves: one clip trims as the next extends. |
| Slip | Y | The clip shows earlier or later source, keeping its place and length. |
| Slide | U | The clip moves between its neighbours, which trim and extend to meet it. |
Pressing B during an edge drag with Select turns the ripple on for that drag, and
releasing it turns it off.
While an edge is dragged the Viewer shows the frame at the edge, the clip draws a faint outline of its whole source, and a readout beside the pointer counts the frames moved.
Snap holds a dragged edge to the start and end of every clip, the playhead and markers.
S turns it on and off, and Ctrl suspends it. Esc abandons a drag.
Vegas drags
Section titled “Vegas drags”Settings ▸ Shortcuts ▸ Clip drags in Cut set to Vegas changes what a drag with Select does. The Vegas shortcut preset sets it.
| Drag | What it does |
|---|---|
Ctrl+drag a clip | Moves copies. A Ctrl+click still adds to the selection. |
Ctrl+drag an edge | Stretches the clip. |
Alt+drag a clip | Slips it. |
Ctrl+Alt+drag a clip | Slides it. |
Shift held | Suspends snapping. |
| Drag on empty track space | Sets the work area. Ctrl held draws a selection box. |
Shift+click a clip | Selects every clip from the last one clicked, across the tracks between. |
A click on the tracks also moves the playhead there.
With the Vegas preset the wheel zooms with no key held and scrolls the tracks with Ctrl,
Q turns looping on and off, G and U group and ungroup, and V and P show and hide
the volume and pan envelopes. T and Shift+T switch the picked clips to their next and
previous take, Ctrl+Shift+V pastes a clip’s attributes onto them, and R adds a region
over the work area.
Choosing Vegas when Lumit first opens loads the Vegas preset and turns on Clip drags in Cut and Auto crossfade.
Switches
Section titled “Switches”| Switch | Key | While it is on |
|---|---|---|
| Auto ripple | Shift+B | Delete closes the gap, an edge dragged with Select is a ripple trim, and a moved clip takes everything after it along. |
| Auto crossfade | Shift+X | A clip dragged across the end of another keeps the overlap, which dissolves or crossfades. A clip dropped over the whole of another, or inside one, overwrites it. An edge pulled into the clip it meets dissolves into it. |
| Quantise | Alt+F8 | Sound clips move in whole frames. Off, a sound clip dragged alone lands where the pointer is, between frames. |
With Auto crossfade off, a moved clip overwrites what it lands on.
A sound clip that sits between two frames shows how far past the frame it starts.
Quantise is also Settings ▸ Timeline ▸ Sound moves in whole frames. Sound clips in the Audio timeline and Audio layers in the Timeline follow it.
Editing at the playhead
Section titled “Editing at the playhead”| Key | What it does |
|---|---|
Q, W | Removes the clip’s start, or its end, up to the playhead and closes the cut. With nothing selected it acts across every track, to the nearest edit point. |
Alt+Q, Alt+W | The same, leaving the gap. |
Shift+Q, Shift+W | Rolls the previous, or the next, edit point to the playhead. |
Ctrl+K | Cuts the selected clips’ tracks at the playhead, or every track with nothing selected. The pieces stay selected. |
Ctrl+Shift+K | Cuts every track at the playhead. |
D | Selects the clip under the playhead. |
↑, ↓ | Moves the playhead to the previous or the next edit point. |
Alt+←, Alt+→ | Moves the selected clips one frame. With Shift, five. |
Alt+↑, Alt+↓ | Moves the selected clips up or down a track. |
Removing and copying
Section titled “Removing and copying”Deleteremoves the selected clips and leaves a gap.Shift+Deleteremoves them and closes it. With no clip selected,Deleteremoves nothing, unless the track was picked by its header.- A clip’s menu has Cut, Copy, Paste and Split, Delete clip, which leaves a gap, and Ripple delete, which closes it. Split cuts at the playhead and is there while the playhead is over the clip. Select to end selects the clip and every clip after it.
- Right-click a gap for Paste, Select all and Close gap.
;lifts the work area: everything inside it is removed and the gap is left.'extracts it: the gap is closed.Ctrl+Ccopies the selected clips,Ctrl+Xcuts them, andCtrl+Vpastes at the playhead, onto the selected track when there is one. The playhead moves to the end of what was pasted.
Fades and dissolves
Section titled “Fades and dissolves”Two picture clips that overlap on a track dissolve across the overlap. Two sound clips that overlap crossfade.
Ctrl+Dputs a one-second dissolve on the edit point nearest the playhead. Each clip is extended into its own source to make the overlap, as far as its media allows.- Drag either edge of a dissolve to lengthen or shorten it.
- A clip’s menu offers Fade in and Fade out, which bring a picture clip up from or down to transparent, and a sound clip from or to silence.
- With Select, drag the handle at a clip’s top corner to set the length of its fade. Dragged back to the corner, the fade is removed.
- Right-click a fade, a dissolve or a crossfade for its curve: Linear, Fast, Slow, Smooth or Sharp.
- A dissolve between two clips with no spare media at the cut is refused.
Effects and blend mode on a clip
Section titled “Effects and blend mode on a clip”A clip carries an effect stack of its own, which runs ahead of its track’s. Selecting one clip shows its stack in Effect controls, marked Clip. An effect or a preset dragged from Effects & presets onto a clip lands on that clip, and a double-click there applies to the selected clip. Click a track’s name to see the track’s own stack.
Every clip has an fx button at its top right, lit while the clip has effects that are on. Clicking it selects the clip and shows its stack. Bypass effects on the clip’s menu turns the stack off.
A picture clip also has a Pan/Crop button. It puts a Crop and a Transform on the clip, where it has none, and opens the Pan/Crop window: the clip’s frame with a box over the part that fills the picture.
- Drag inside the box to pan, a corner or an edge to zoom, and the knob above it to turn it.
- X, Y, Width, Height and Rotation type the box exactly.
- Lock aspect keeps its proportions, and Fill frame puts it back over the whole frame.
The box writes the Transform’s anchor, scale and rotation, at the playhead on a keyed property. The Crop’s edges are set in Effect controls.
Blend mode on a picture clip’s menu gives the clip a blend mode of its own. From layer hands it back to the track’s.
Keyframes on a clip’s effects move with the clip. A cut gives each piece its own copy of the stack.
Inside a dissolve each clip’s effects fade out or in with the clip. The blend mode is that of the clip that is more than half of the picture.
Each picture clip carries its speed as a line across it, in per cent, which is edited where it lies. The Speed switch on the strip shows the lines on every clip. It is off to begin with. Speed line on a clip’s Speed menu shows the line on that clip alone, and a retimed clip shows its line either way. The points and curves behave as in the speed envelope.
| On a picture clip’s Speed menu | What it does |
|---|---|
| Speed… | Sets the selected picture clips to one speed. |
| Reset speed | Sets them back to 100%. |
| Copy speed | Copies this clip’s speed line. |
| Paste speed | Gives the selected picture clips the copied line, stretched to each one’s length. |
A picture clip’s linked sound clip plays at normal speed.
A sound clip’s level is a line across it, at the top for 0 dB. Drag it down to turn the clip
down, with Ctrl for finer steps. Double-click it to put it back at 0 dB. A readout beside
the pointer gives the level, and the waveform shrinks with it.
A picture clip’s opacity is the same line along its top edge. Drag it down to make the clip see-through, and double-click it to put it back at full. Below full the line shows across the clip.
A clip can hold several takes: other footage shown in the same place, as in Vegas.
- Drop footage on a clip with
Altheld to add it as a take. The clip shows it. Tshows the next take andShift+Tthe previous one, on the selected clips.- Take on a clip’s menu lists them, with the one showing ticked. Delete take removes the one showing.
A take keeps the clip’s place, length, speed, effects and fades. A linked sound clip of the same footage changes take with it.
Paste attributes
Section titled “Paste attributes”Paste attributes on a clip’s menu, or Ctrl+Alt+V, gives the selected clips the
copied clip’s effects, gain, opacity, blend mode, fades and speed. Copy the clip first with
Ctrl+C.
Envelopes
Section titled “Envelopes”A sound track’s volume and pan can be drawn as lines across the whole track, as in the
Audio timeline. Shift+V shows and hides the volume envelope and
Shift+P the pan envelope, on the selected clips’ tracks or the track last clicked. A track
whose volume or pan has keys shows its envelope to begin with.
- Drag the line up or down. Between two keys both move.
- Drag a key to move it in time and value.
ShiftorAltheld moves it in time only, andCtrlgives finer steps with its time held. - Double-click the line, or
Ctrl+click it, to plant a key.Alt+click removes one. - Double-click a key to put it back at 0 dB or centre.
- The value shows beside the pointer while dragging.
Right-click a key for Reset and Delete. Right-click the line for Add point, the curve of the stretch under the pointer (Linear, Fast, Slow, Smooth, Sharp or Hold), Flip all points and Reset all.
An envelope shows on a track tall enough to take it, under the fade handles. A locked track’s envelope cannot be dragged, and a property driven by an expression has none.
Groups
Section titled “Groups”Ctrl+G, or Group on a clip’s menu, puts the selected clips in a group. While
Linked is on, selecting one clip in a group selects the rest, so they move, trim, cut and
delete together. A cut through a group leaves two groups, one each side. Ctrl+Shift+G, or Ungroup, takes the selected clips out of their
group. A copy of a clip is outside the original’s group.
Clips as compositions
Section titled “Clips as compositions”Open as composition on a clip’s menu turns the clip’s footage into a composition and opens it. The clip plays that composition from then on, showing what it showed. Its linked sound clip is left as it was.
Double-clicking a clip that already plays a composition opens the composition.
What a ripple moves
Section titled “What a ripple moves”A ripple moves the clips after the edit on every unlocked Sequence layer, and the other layers that start after it. A clip that straddles the point stays where it is.
A ripple that would move a clip onto one that stays is refused, and the status line says so. Lock the track holding that clip, or clear the space.
= and - zoom about the playhead. \ fits the whole composition, and again returns to
the zoom before. During playback, or after a key moves the playhead, the view pages along
when the playhead leaves it.
Markers run as lines down through the tracks, and a region, a marker with a length, as a
faint band. R adds a region over the work area.