
Project
Last updated
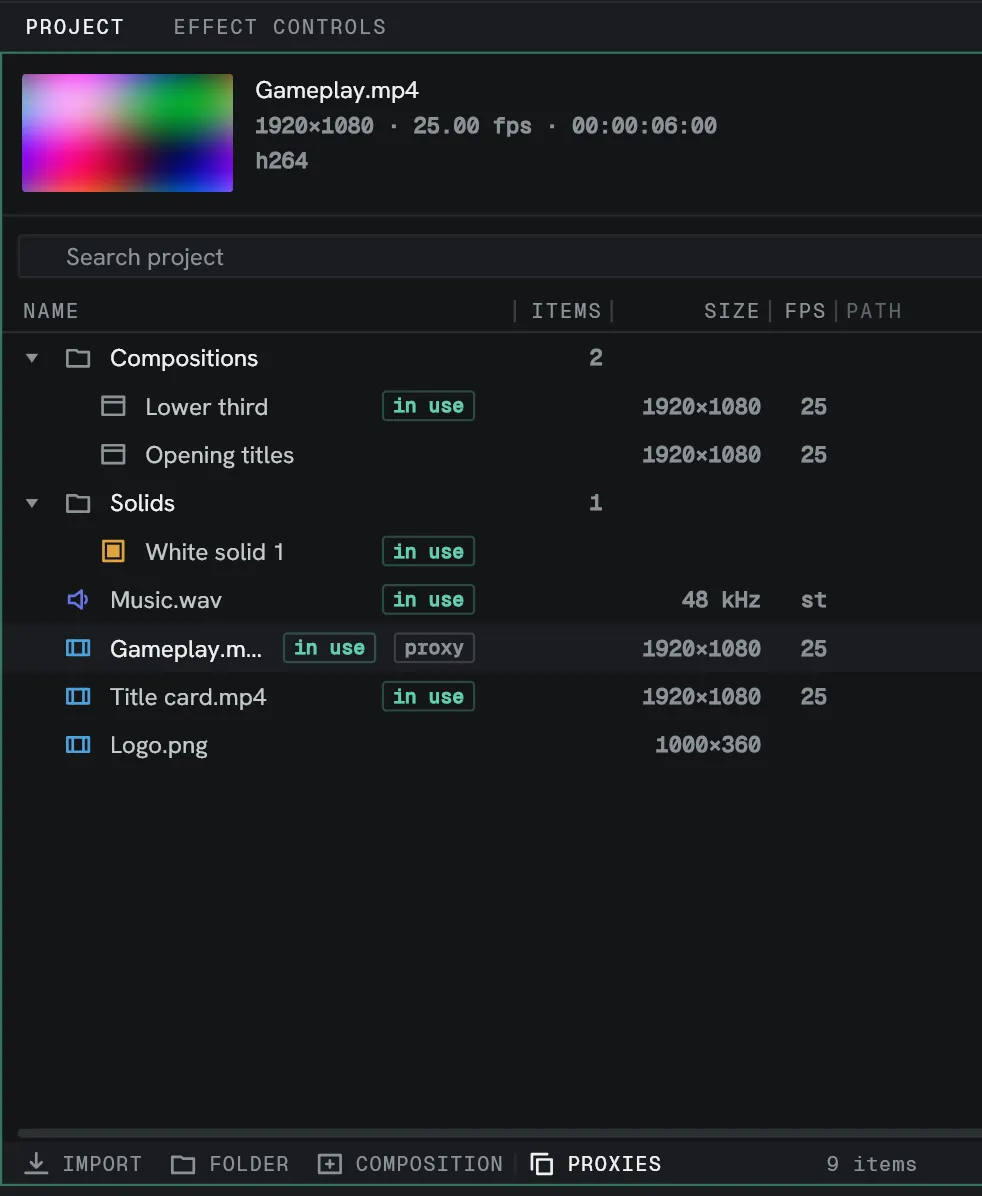
The Project panel holds everything imported, every composition, and everything else made outside a timeline.
| Item | What it is |
|---|---|
| Footage item | A reference to a media file on disk. |
| Audio item | A reference to a sound file on disk. |
| Composition | A timeline. It can be used as footage inside another composition. |
| Node graph | A composition made of boxes and wires. Its row wears the nodes glyph and the type word node graph. |
| Folder | A grouping inside the panel. It creates no folder on your computer. |
| Solid | A solid colour. |
Top to bottom the panel is a preview card for whatever is picked, a search well with the colour filter beside it, a row of column headings, the tree, and a bottom bar.
The preview card
Section titled “The preview card”Select an item and the card at the top shows what Lumit knows about it: a thumbnail, the name, and the facts — resolution, frame rate, duration, codec. Sound reads its rate and channels; a folder reads how many items it holds.
Move the pointer across the thumbnail to scrub the clip. Leaving it puts the first frame back. A still and a sound file have nothing to scrub.
A sound file carries a play button where the thumbnail would be. It plays the file from the start, with no composition behind it. Pressing it again stops it, and so does selecting something else or playing a composition.
Bringing things in
Section titled “Bringing things in”- Drag files onto the panel from your file manager. This is the same command as File ▸ Import footage, so a batch is one undo step and image sequences are spotted for you.
- Drop a folder and it is read one level deep for files Lumit can take.
- Double-click empty space in the tree to open the import dialogue.
A .lum project, or an After Effects .aep or .zip, is not opened by dropping it —
import those from the menu.
Clicking and opening
Section titled “Clicking and opening”A click selects. A click on the row that is already the lone selection opens it.
| Item | What opening does |
|---|---|
| Composition | Fronts it in the Viewer and Timeline. |
| Node graph | Fronts it in the Node graph panel. |
| Footage | Raises New composition with the resolution, frame rate and length already matched to it. |
| Folder | Shows or hides its children. |
Footage and composition rows drag onto the Timeline; a composition lands as a Precomp layer. Dropped onto COMPOSITION on the bottom bar instead, they raise the same New composition dialogue with the media’s size, rate and length filled in, and every dropped item lands in the finished composition as a layer.
Renaming is Enter, or Rename on the row’s own menu.
Colour labels
Section titled “Colour labels”Right-click a row and pick a chip from the Label strip. The tag tints the item’s glyph.
A folder hands its colour down. A row with no tag of its own wears the colour of the nearest tagged folder above it. An explicit tag always wins over an inherited one.
The dots beside the search well filter by colour: tap one to narrow the tree to the items wearing it, tap the neutral dot — or the held colour again — to show everything.
Proxies
Section titled “Proxies”A proxy is a smaller stand-in that keeps previews fast. Attach one from the row’s menu:
Set proxy… points at a file you already have, Make proxy transcodes one in the
background, Use proxy decides whether this item reads from it, and Clear proxy
forgets it. A row reading from its proxy wears a proxy badge beside in use.
PROXIES on the bottom bar is the master switch for the whole project — using proxies, or using originals — and an export reads the originals whatever it is set to. See Proxies.
Missing files
Section titled “Missing files”If a file moves, its row has a missing badge and the glyph turns to a broken link. The
badge is the relink control: click it and pick the new path, and every layer using the
item recovers. Find missing footage on the row menu searches for it instead.
The count at the right of the bottom bar reads 1 missing · 10 items when anything is
broken, and clicking it filters the tree down to the broken rows alone.
Colour space
Section titled “Colour space”A footage item’s own menu carries a Colour space submenu: As the file says, which is where every item starts, and — where the project names a colour configuration — that configuration’s own space names underneath. See Colour management.
Overriding a file’s frame rate or its alpha is planned; there is nowhere to do it today.